Monday, December 3, 2012

What I've Been Working On...

I know I have been missing in action. Life has really been overwhelming for me. I'm not going to go into any annoying details, I know we all have a lot on our plates. This blog started out as being a place for Erica and I to share the things we love and I'm pretty sure it will carry on as time, money, and mostly energy permits. :)

So, at the beginning of the year (can you believe we are in December!!!) Erica and I posted our New Years Resolutions for the world to see. In January I'll go more over my part in detail but one of my resolutions was to finish some major scrapbooking projects that really needed to be done. You can check out my full post HERE. I wrote that I needed to get three done. I finished my Project 365 awhile ago and I'm now on the brink of finishing Maggie's first year album. Woohoo! Let me remind you, she's 6 now. *sigh* But I have 3 more pages, 3!! I'm so glad cause I'm seriously running out of time. I'm forecasting being done today! :)

Here are my recent pages...

LivE Designs- Center of Attention Album Templates (Love these!!!), Splendid Fiins- Very Krafty Neutrals, Office Supplies (staples), Jodi Lee- Vintage Papers, Pink Paislee- Happy Now Elements, PortBeach Elements, Nancie Row Janitz- Vintage Blooms
 
Becky Higgins- Project Life Template B, Clementine Title Card, Glitz Designs- Yours Truly Full Kit (Love this gorgeous kit!!), Splendid Fiins- Office Supplies (My go to staples!), Fonts: Traveling Typewriter, CK Ali's Hand, JSHS Font from Motography, Bebas 

Becky Higgins- Project Life Template B, Blank grid journaling card, Clementine journaling card (re-colored), Glitz Designs- Yours Truly Full Kit, Splendid Fiins- Office Supplies, Fonts: Traveling Typewriter, CK Ali's Hand 

Becky Higgins- Project Life Template A, Glitz Designs- Cashmere Dame (papers and elements), Splendid Fiins- Feedsack Washi Tape and Greyed Out Washi Tape, Fonts: Traveling Typewriter, Clementine Sketch

Becky Higgins- Project Life Template A, Glitz Designs- Cashmere Dame (papers and elements), Splendid Fiins- Feedsack Washi Tape and Greyed Out Washi Tape, Fonts: Traveling Typewriter, Clementine Sketch 

Splendid Fiins- Go Big Template #4, Pink Paislee- Happy Now Paper Pack
Photo by Captured by Adrianne

Awesome, right?! If you noticed 4 of the 6 pages I used the Project Life format by Becky Higgins. I used the digital templates and some items from the Clementine kit. I am super excited about this because I was a bit overwhelmed about getting this project done, doing the designing of layouts,picking out a kit, taking the time, etc., you know the "traditional" way of scrapping. The whole Project Life method saved me. Thank goodness. Next year I have some new projects up my sleeve, all dealing with Project Life. I'm excited. :)

Well, here's to keeping resolutions! Even if they are last minute. ;) Anyone else scrambling to get some resolutions done? I doubt it. Tomorrow I start Christmas projects. Gotta love December!

Love, Monica :)

Saturday, October 27, 2012

Pumpkin Cupcakes w/ Cream Cheese Frosting

Monica posted these awhile back.  I whipped them up for a party last weekend and they were absoltuely perfect.  Quite the hit!  Delish!

Well I found it. I found my perfect go to pumpkin cupcake. I'm excited because so far I've had only semi good luck when making a pumpkin cupcake. Last year I did the Martha Stewart Pumpkin cupcake and although it tasted good it had more the consistency of a muffin. Sorry Martha. This cupcake is light and fluffy and delicious. The frosting on the other hand is all Martha. This is my favorite cream cheese frosting. It is simple, basic, and perfect. It tops this cupcake perfectly.

I wanted to take pictures of my process but I was in a hurry. So you get the finished product and the recipe so you can tries these babies out at home.

Enjoy!


Pumpkin Cupcakes
4 eggs, slightly beaten

3/4 cup Oil
2 cups sugar
1 (15 ounce) can pumpkin
1 3/4 cups all-purpose flour
1/4 cup Corn Starch
4 teaspoons Pumpkin Pie Spice
2 teaspoons Baking Powder
1 teaspoon baking soda
3/4 teaspoon salt

Blend the eggs, oil, sugar, and pumpkin in a large mixing bowl; set aside. Stir together dry ingredients in a separate bowl. Add dry ingredients to pumpkin mixture and beat until well blended. Scoop into lined muffin tins. Fill about 2/3 full. Bake in preheated 350 degrees oven for 30 minutes or until center springs back when touched.

My oven cooks hot so these only took 20 minutes and they were perfect. Make sure you check on them earlier than 30 minutes. If you touch the top and it bounces back, they are done.

Martha Stewart Cream Cheese Frosting
8 oz. Butter (2 sticks) room temp.
12 oz. Cream Cheese room temp.
1 lb. (4 cups) powdered sugar
3/4 teaspoon vanilla

Cream the butter and cream cheese together until they are light and fluffy. Add powdered sugar and mix well. Add vanilla and mix. Now get a spoon and taste. Heaven. :)

Source: Allrecipes.com, MarthaStewart.com

By the way...the cupcake topper was made using Photoshop Elements and Products from JessicaSprague.com. One more thing you can do with your digital stash. :)

Monica :)

Monday, October 15, 2012

Pumpkin Streusal Muffins

We are deep into Fall. The air is getting crisp and the colors are breathtaking. I love this time of year. With the cool air comes the need to get in my kitchen to bake. I've been looking for muffin recipes to stock up in the freezer. My son loves them for snack at school. Anyway, I found this little treasure. If you're looking for a Fallish pumpkiny muffin, here you go my friend. :) Pumpkin + Buttery Streusal, you can't go wrong.


Pumpkin Streusal Muffins
1 3/4 cups all-purpose baking flour
1 cup sugar
2 teaspoons baking powder
2 teaspoons pumpkin pie spice
3/4 teaspoon salt
2 eggs
1 cup canned pumpkin
1/2 cup canola oil (You can use applesauce!!)
3 teaspoons vanilla extract

Streusal:
1/4 cup all-purpose baking flour
1/4 cup sugar
1/4 cup packed brown sugar
1/2 teaspoon pumpkin pie spice
1/4 cup butter

In a large bowl, combine the flour, sugar, baking powder, pie spice and salt. In another bowl, combine the eggs, pumpkin, oil and vanilla. Stir into dry ingredients just until moistened. Coat muffin cups with cooking spray or use paper liners; fill three-fourths full with batter.

For topping, combine the flour, sugar, brown sugar and pie spice; cut in shortening until crumbly. Sprinkle over batter. Bake at 350° for 25-30 minutes or until a toothpick inserted near the center comes out clean.


Have an aweome Monday!!

Love, Monica


Tuesday, October 9, 2012

Apple Pie Caramel Apples

I made these a couple of years ago for a Monday Match up post. Remember those Erica? Oh good times. Anyway, I figured they needed a post of their very own. They are just too dang good.

I learned this technique from my good friend Michelle. We used to make hundreds of them for a fund raiser for our Special Education class. They were a hit. I love the tart and sweet together. Yum! They are a perfect Fall treat and great for a party or for a family get together. My kids had a ball helping out and they taste so yummy. Give them a try!


Apple Pie Caramel Apples


5 Granny Smith Apples (the tartness of these balances perfectly with the sweet coating)
1 pkg. caramels
White Chocolate or White Almond Bark or White Candy Melts (any will work)
Cinnamon/Sugar Mixture
5 Popsicle Sticks

If you want to make a ton of these you can usually find a huge brick of caramel at food supply stores. Those in Utah can find them at Orson Gygi or Kitchen Kneads in West Jordan. Kraft also makes Caramel Bits in a bag by the chocolate chips. These are nice because there is no unwrapping of caramels. I bought a bag of wrapped caramel because they were cheaper and they had the sticks with them. Any of these work.

As far as the white coating, I have used the white candy melts with great success. They were thin enough to give the apple a nice coating. With these I had some white almond bark leftover so I used that. It was a little thick and even when I thinned it, it still gave the apple a pretty thick coating. No problem for me for a family treat, but I would want it a touch thinner if I was presenting them somewhere. I haven't tried the plain white chocolate. I'm sure it would work just fine too.

So, wash the apples really well and dry completely. It is best if your apples are at room temp. I took mine out of the fridge ready to get started and had to wait a few hours because they were "sweating". If you dip them while they are wet your caramel will just fall right off. Not good. Take the stems out and insert the sticks. Next, melt the caramel. I did mine in the microwave but you can do it on the stove top too. Dip your apples and coat thoroughly. Hold the apple over the bowl and let it drip. Place on a sprayed piece of parchment. This works the best, I promise. Do all your apples, reheating the caramel if needed. Let sit until completely set. For a nicer looking apple, use kitched shears to trim off any excess caramel on the bottom.

Next melt your white candy melts, also done in the microwave. Dip each apple the same as the caramel and immediately sprinkle with cinnamon and sugar. Let sit till set. We like to cut these in pieces. Enjoy!

Love,
Monica 


Monday, October 8, 2012

I am a Mormon

Hi all! I hope you all are having a great weekend. I've never been one to yell from the rooftop my religious preference but after today's conference, I thought maybe I should. Every six months our church does a general conference where our church leaders including our Prophet speaks words of inspiration to us. This morning Sister Ann Dibb spoke about taking a stance and living by it. She coined the phrase, "I am a Mormon. I know it. I live it. I love it."

I loved it! I thought it would make a great printable for my kids' bedroom and look good on our blog sidebar. I'm not the only one. I'm seeing them all over Pinterest and Instagram already. Here is my take on it.


This is an 8x10 jpg image. If you want it you can download from Google docs HERE. If you nab it please remember to give credit where credit is due and it may only be used for personal use. Speaking of, the background paper is by Dani Mogstad. Thanks so much!

I hope you enjoyed your conference weekend. I'm feeling uplifted and refreshed. Now onto face a new week!

Love,
Monica

Friday, October 5, 2012

Cheesy Ranch Broccoli Bacon Noodle

Say that 5 times fast!  ;o)  I've been on a comfort food kick.  My family MIGHT just be getting sick of the cheesy buttery goodness i've been making the past couple of nights.  I will be honest...I've been lacking in the kitchen department lately.  I've been dieting, and I finally came to the end of my string with that.  I've missed eating what my family eats. I got tired of cooking different things for them for dinner.  And I've really missed making yummy things for the blog. 
 
This was right up my alley for comfort food.  Read that title!  Yum!!! 


Oh my!
 
Cheesy Ranch Broccoli Bacon Noodle
16 oz. small shells noodles
1 package of bacon, cooked and crumbled
1 regular sized bag of frozen broccoli
1 1/2 c. milk
3/4-1 c. ranch dressing
16 oz. of sharp cheddar cheese, shredded or your favorite cheese. 
(I used half colby jack and half sharp cheddar)
 
Boil noodles according to package directions.  While that's boiling, cook your bacon in a large pan and steam your broccoli.  Make sure not to cook your broccoli too long or it will get all mushy.  Unless you like mushy broccoli.  When your bacon is good and crispy, remove it from your pan. Pour out all your grease except maybe a tablespoon or so to give your dish even more of a bacon flavor.  Add your milk and ranch.  Stir until combined.  Pour in your shredded cheese.  Stir until it's all good and melty.  Don't have your heat too high.  You don't want this to burn.  Add your broccoli, bacon, noodles.  Stir until all combined.  Let it thicken a little bit more and then ENJOY!
 
Seriously...so so GOOD!
 
This makes quite a bit of food.  You could easily half the recipe.
 
I'm off to get a crown in my mouth.  I'm scared to death!  Wish me luck!
 
Happy Friday!
Love, Erica*
 
Adapted from-Little BGCG


Thursday, October 4, 2012

10 Healthy Snacks for the Kiddos


When I moved from Utah, I was surprised when I had to provide a snack for my kids at school. In Missouri I had to send a snack once a month for the whole class. I didn't mind that. Here in Michigan I have to send a daily snack for my kids. That takes a little more thinking and creativity. I'm getting better at it but I hit Pinterest for ideas along with my own to create this list.

1. Muffins
These make an easy portion controlled snack. You can make a bunch and freeze a dozen or so for later. I love being able to take a couple out the night before and have them ready to go in the morning. You can also make these as healthy as you want adding applesauce instead of oil and mixing in whatever fruits and veggies you want.

Erica and I have made a lot of muffins right here on our own little blog.


You can find more of our Muffins HERE.

2. Granola
Granola is easy and also very adaptable. Make it as healthy as you want. There are tons of recipes out there. This is the one I make and love.


3. Granola Bars
I was so excited when I made my first granola bars. I love how easy they came together and I knew every ingredient in them. I love that.


Just do a search on Pinterest for Granola Bars. There are hundreds. :)

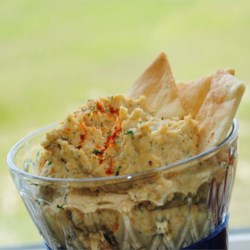
4. Fresh Veggies and Hummus
We love Hummus at our house. It's such a tasty treat with fresh carrots sticks or Pita chips. It's so easy to blend up too. You can make hummus very complicated or very easy. There are many many recipes out there.

Hummus III Recipe
Here is a basic recipe from Allrecipes.com. You can adjust the ingredients to your taste. I never really follow a recipe but basically use these ingredients. Find it HERE.
Photo also from Allrecipes.com.

5. Fruit and Crackers
I loved this when I saw it on Pinterest. (I have yet to try it.) But it's such a cute way to make snacktime fun. Plus, it's an easy one to throw together if the pins are already made.

This is from Jugglingwithkids.com. Cute, right?

6. Healthy Breakfast Cookies
I like the idea of these. Maggie doesn't love granola bars, but I think she would go for this.

Pinned Image
These cookies pictured seem to have a lot of "fancy" ingredients. You can find the recipe HERE. You can also find a good list on Allrecipes.com HERE.

What kinda fits in this category are these Energy Bites. I've made them a couple of time. Most of us like them. Maggie is just picky. :)

Find them HERE!

7. Boiled Eggs
Nothing like opening a baggie with a boiled egg inside! Smells gross but tastes pretty awesome. I loved this photo I saw on Pinterest. Now Maggie would really get a kick out of these and would gobble them up!

Pinned Image
This is another good snack resource. Super Healthy Kids.

8. Peanut Butter with...
A lot of schools have restrictions with Peanut Butter so be in the know about your childs' schools policy on this. My kids can take PB, so it works for us. They love it too!! Of course you can pair PB with lots of things. We make our PB but I love the Jiffy single serving cups too.

Banana Boats

9. Fruit (You Can't go Wrong!)
Whether you send fresh or dried, it's a good choice. Erica makes a yummy fruit leather that kiddos love. It's easy to make a fruit dip or an occasional caramel to go with a fruit cup too.


10. Popcorn
Mmmm. I love popcorn. There are so many variations to make popcorn tasty and healthy too. It doesn't have to always be butter or caramel to make it amazing.

Pinned Image
Photo Credits Here.

Here is a whole list from Allrecipes.com. Yum!

Okay, that's it! I hope I've given you some ideas and recipes to send the kiddos off to school with yummy snack. Have a great day!!!

Love,
Monica


Monday, October 1, 2012

Digi Day and a WINNER!

There are some new classes coming to JessicaSprague.com that look so fun. The first one starts today and you can still register until Wednesday.


Jessica gave us a little sneak peak last week and the announcement is to die for!

If you've ever been interested in designing your own invitations and announcements, this is the class for you. You can register HERE.

Candice Stringham is also starting a new photography class. If you are looking to up your photography skills, she is a professional photographer and does a great job at teaching. Check it out HERE.


As far as my work goes, I have three layouts to share with you.


I love Fall and I love this fun mini kit by Echo Park. Buy it Here!
Full Credits Here.

Awww, Hawaii. I miss that beach. These fun papers are by Dani Mogstad. The template is by Jessica Sprague from her Photoshop Friday series.
Full credits Here.

These gorgeous papers are by The Glitz Girls.
Full Credits Here.

I hope you are having a wonderful Monday! Now for the winner of our Giveaway!!!
 
I used the Random Number Generator, and the lucky winner is....Michele!
Michele said on September 25, 2012 3:42 PM
Love, Love, Love these aprons! This particular one has a great design!
 
Yay!  We need to get your address, so we can get this shipped out to you ASAP!  Email it to us at enjvanbeb@yahoo.com  Can't wait to hear from you! 
 
Love, Monica and Erica*

Wednesday, September 26, 2012

Banana Crumb Muffins

I needed something quick for a brunch and just so happened to have some ripe bananas on the counter. I love when bananas get dark. I kind of secretly hope the kids won't eat the bananas so I "have" to make a banana treat. I wanted to try a new recipe and found these little treasures. I love the streusal on top. They make this muffin perfect.

Banana Crumb Muffins
1 1/2 cups all-purpose flour
1 teaspoon baking soda
1 teaspoon baking powder
1/2 teaspoon salt
3 bananas, mashed
3/4 cup white sugar
1 egg, lightly beaten
1/3 cup butter, melted (Sometimes I use applesauce)
1/3 cup packed brown sugar
2 tablespoons all-purpose flour
1/8 teaspoon ground cinnamon
1 tablespoon butter

Directions
Preheat oven to 375. Lightly grease 10 muffin cups, or line with muffin papers.

In a large bowl, mix together 1 1/2 cups flour, baking soda, baking powder and salt. In another bowl, beat together bananas, sugar, egg and melted butter. Stir the banana mixture into the flour mixture just until moistened. Spoon batter into prepared muffin cups.

In a small bowl, mix together brown sugar, 2 tablespoons flour and cinnamon. Cut in 1 tablespoon butter until mixture resembles coarse cornmeal. Sprinkle topping over muffins.

Bake in preheated oven for 18 to 20 minutes, until a toothpick inserted into center of a muffin comes out clean.

Source: All Recipes

These are perfect for a quick breakfast or after school snack. Hope you're having an awesome week. Fall is in the air. I love Fall. I just wish it would stay Fall for awhile. Here's to hoping!

Make sure you enter our Giveaway! Chances are good right now! Do we have 12 entries yet Erica? ;)We are giving a gorgeous apron made by The Rubied Apple. Check out her Etsy store here.

Love,
Monica


Tuesday, September 25, 2012

Pumpkin Cake with Cream Cheese Frosting

Do you know how long I've been waiting for Fall, and all the wonderful things that come along with it?  FOREVER!  I love Fall.  The smells, flavors, leaves changing, cooler air, warm clothes...everything about it! 

I thought I'd ring in the new season with a pumpkin cake.  I have a recipe for a giant sheet cake too, but knew if I had that sitting around my house all week, I would consume the entire thing.  This one is perfect. You bake it in a small 8x8 pan, and it's usually gone the night you serve it.  YAY!  It's flavors go together so perfectly.  The cake is so soft and moist.  Almost wish I had a piece to eat right now.  *sigh*  O'well. 

Amazing...and oh, so beautiful!
 
 
Pumpkin Cake
1/2 cup vegetable oil
1 cup sugar
2 eggs
1 cup flour
1 teaspoon baking powder
1/2 teaspoon baking soda
1/4 teaspoon salt
1 teaspoon cinnamon
1 cup pumpkin puree

In your mixing bowl combine oil, sugar, and eggs.  Whisk together until all combined.  Add in flour, baking powder, baking soda, salt, and cinnamon.  Stir around until there are no more lumps.  Add in pumpkin and stir until well combined.  Pour into greased 8x8 baking dish.  Bake at 350 degrees for 25-30 minutes or until toothpick comes out clean.  Let it cool completely before icing it.


Cream Cheese Frosting
2 oz. cream cheese, softened
1 tablespoon butter, softened
1/2 teaspoon vanilla
1/2 cup + 2 tablespoons powdered sugar
1/2 tsp. milk

Beat your cream cheese, and butter together until light and fluffy.  Add your vanilla and sugar, and mix until well combined.  Add your milk.  If it's too thick add a tiny bit more.  Ice your cake, and ENJOY! 

Source-Kitchen Simplicity

Have you entered our giveaway yet?!  If not click HERE and go enter ASAP!  You have until Thursday night to do so. 

I love this!  Ha ha!  I don't even have 12 entered.  So go do it!
 
Have a happy Tuesday!
Love, Erica*


Thursday, September 20, 2012

GIVEAWAY from The Rubied Apple

Did I catch your attention?  I hope so!  I'm so excited about this sweet giveaway.  One of our sponsors was so gracious to send us some of her beautiful creations to giveaway to some of our readers.  Her name is Nakia.  And she has a shop on etsy called The Rubied Apple.  She is so talented and I absolutely LOVE her aprons.  They are fun, sexy, and sophisticated.  Who doesn't want to feel that way when they are whipping up something yummy in the kitchen.  Make sure to check out her fun etsy shop and her Facebook page.

Here's her bio-

My name is Nakia. I am a mom, wife, friend, photographer and student. I spend most of my time with my little one or at my sewing machine making aprons.
I LOVE TO MAKE APRONS and I love to capture memories with my camera.
The Rubied Apple came about for the purpose to help pay for my son's medical expenses, he has a disorder called Tuberous Sclerosis. I woke up one morning and there it was Rubied Apple. It is fitting because health and wellness(Apple) is so precious (Ruby (ied) ).
I first started with making aprons. When I look at an apron it is not just a piece of cloth that covers you from stuff getting on you, but I honestly see love, and care in those who wear them.
I feel like someone who wears an apron will take the time to care for me.
Another way you can like my Rubied Apple is at my FACEBOOK page
Hope to see you there!


Here's the style of apron we will be sending our lucky winner.  I don't have a picture of the one I have to send out, but it will be in this style.  

How gorgeous, and sexy is this little number?


I know you want one as much as I do!

You can enter up to 3 times.  Here's how-
1st entry-If you are a follower on our blog, leave a comment.
2nd Entry-If you follow us, and The Rubied Apple on Facebook, leave a comment.
3rd Entry-If you share this fun giveaway on your facebook page, or twitter account or anywhere that people will see it. Make sure to leave a comment.

And there you have it!  Good luck!  You have until Thursday of next week to enter.  We will announce the winner on Friday, the 28th.  Yay!  

Have a happy Thursday!

Love, Monica and Erica*


Tuesday, September 18, 2012

Chocolate Heath Cake

My sister in law used to make this cake quite often when I joined the family. She is such a great cook and I know she has influenced me in many ways to be the cook and baker I am today. I was looking for an oldie but goodie to make for my son's 9th birthday (9!!!) and wanted a special treat.

This cake is an easy doctored cake mix and always produces a moist cake with the perfect touch of chocolate. The whipped cream frosting and crushed Heath Bars are the star of the show. It was the perfect end to a great celebration. Thanks for the recipe Jame!


Chocolate Heath Cake
Yellow cake mix (with no added pudding, you'll add this next)
6 oz. box of instant chocolate pudding

Mix cake according to directions with the addition of an extra 1/2 cup of water. (The batter will be thick.) Bake according to directions in a greased 9x13 pan.

Frosting:
Mix 1/4 cup softened butter with 1 cup of powdered sugar and 1/2 cup of Cool Whip until smooth. Stir in the remaining 8 oz. tub of Cool Whip. Spread on the cake. Crush 3-4 Heath Bars and sprinkle on top.

This cake is perfect for a potluck or get together. Quick, easy, and delicious!!

Have a great Tuesday!

Love,
Monica


Friday, September 14, 2012

Beef and Broccoli-Guest Post

Happy Friday, everyone!  I'm so excited to have the weekend here!  Fall is in the air!  Woooooo!  Love when it starts cooling off and the leaves start to change.

My good friend, Candis, has offered to do another guest post.  Her last one was amazing!  My husbands new favorite dessert.  You can find that recipe HERE


This is one of my favorite light, quick meals. It has a delicious flavor and is filling and healthy. It calls for fresh onion, garlic, ginger and broccoli, but I've used dried spices and frozen broccoli and really enjoyed it.


Blanch or steam:
4 cups broccoli florets until tender and bright green (usually about 5 minutes).

While that's steaming, saute:
1/2 sliced red onion
1 tbsp minced garlic
in 1/4 c soy sauce until the garlic and onion are opaque
Add: 1 1/2 lbs top sirloin steak, thinly sliced into 1" strips. Saute for 7-10 minutes.
Add: 1 tbsp olive oil
2 tbsp vinegar and
1 tbsp minced ginger
Add the broccoli and stir together until the broccoli is coated.

Eaten on it's own, Beef and Broccoli has only 218 calories in a 1 cup serving. Or it can be served with any rice or pasta you like best.

Enjoy!

Yummmmmmy!  This is going on my menu for the next week.  Nothing like an easy, delicious meal.

Don't forget to leave us comments leading up to our giveaway next week.  We will enter in every single one from this week on.

Have a fun and safe weekend!!

Love, Erica*

Thursday, September 13, 2012

Thank You Tags

Recently I went on a work trip and needed help with my kids. I am so lucky to have wonderful friends who are supportive and love my kiddos. I wanted to give them a little something special to show my gratitude for them.

So I happened to go to Hawaii for this work trip (I know, I know! It was awesome!) and I picked up some Hawaiian Hershey's Kisses. They have a macadamia nut inside. I filled a cup up with the kisses and added a handmade tag. I love how it turned out.

Cute, Right?


I don't think this photo is true to the colors. I printed out the paper from a digital paper pack by Glitz Designs. It is called Vintage Blue Paper. You can find it here. This is my first time using their products. I love the yellows and blues in this pack, just my style. I then used my lovely Silhouette Cutting machine to cut the different parts of the tag. I love it! I really need to learn how to use it better. I know there is sooo much more I could do with it. The flower is designed by Lori Whitlock, tag itself is by Sophie Gallo, and the thank you word art is by Loni Stevens. You can find all these files in the Silhouette Store.

I think they turned out rather well. I love paper crafting but hated looking for purchased embellishments, sticker sheets, and spending too much time hand cutting. You might be seeing more of this kind of stuff from me. ;)

Hope you're having a wonderful Thursday!

Love, Moni

Tuesday, September 11, 2012

Lazy Chocolate Chip Cookie Bars

Anything that is easy to throw together with awesome results at the end is great in my book.  I made these for a Sunday dessert and we all loved them.  I think it would be easy to throw in some extra things like nuts, or marshmallows.  Yum!  Mix it up a little bit.


Lazy Chocolate Chip Cookie Bars
1 box of yellow cake mix
2 eggs beaten
5 Tbsp. melted butter
2 c. chocolate chips

Heat oven to 350 degrees.  Mix everything up and place in a greased 9x13 pan.  Bake for 20 minutes or until toothpick comes out clean.  Let cool and enjoy with a big dollop of vanilla ice cream! 

Source-Lazy Mom

Hope you are all having a great Tuesday.  Let us all remember 9-11-01. I bet you can remember where you were when you heard the news.  I know I do. 

Love, Erica*

P.S.  I feel a giveaway coming on.  You all deserve it for still reading our blog after our summer off.  Every comment left this week will be entered in the giveaway for next week.  Yay!  Happy day!


Monday, September 10, 2012

Digi Day

Hello!!! It's September! Can you believe it!? The kiddos are in school and I'm working on getting my home clean and organized. I miss them when they aren't home but I'm getting some things done! Bittersweet, indeed. :)

Before I get into my show and tell, I just wanted to say that I made the Spanish Rice Erica posted yesterday. Easy and Yum! I'll never buy a Spanish Rice mix again. I also made it with these enchiladas and my son LOVED them. Need a quick yum dinner, check them out!

Okay, so here are my recent digi adventures...

This layout features a good mix and match of some work from the designers at JessicaSprague.com. I love being on the creative team there. It is such a pleasure to get to work with them. This layout features me trying to get a good photo of Miss Abi. This girl is going to give me a run for my money. She is on the go, go, go! Full credits Here.

This is a template from Jessica's Photoshop Friday series. I love them. Easy and beautiful. I'll take that. All photos are taken by Erica. Full Credits Here. I love this fun kit by Dani Mogstad too! It's called Imagination.

This is another template in the Photoshop Friday series. I needed more photo frames so I added a few. Love all these pics and this fun patriotic kit by Dani Mogstad. Full Credits Here!

Okie Dokie! Happy Monday! I hope it is wonderful! :)

Love, Monica


Friday, September 7, 2012

Spanish Rice

Hey!  Miss me?!  I hope so.  I think things are finally starting to slow down around here.  Holy busy summer, BATMAN!  I hope you all had a great summer.  I don't know about you, but I am so excited for Fall and everything that comes a long with it!

Last night I cooked up my yummy chicken enchiladas and spanish rice for my Dads birthday dinner.  It was a big hit.  Especially the rice.  It is so easy to throw together, and I'm sure you have all of these things sitting in your fridge or pantry.  I also whipped up some heavenly german chocolate cupcakes!  YUM!


Spanish Rice
2 Tbsp. veg oil
1 garlic clove, minced
1 1/2 c. white uncooked rice
2 c. chicken broth
1 c. chunky salsa

Heat oil in a medium saucepan.  Add garlic and stir it around a bit.  (Don't burn garlic.  It's nasty.)  Add your rice and stir it around to coat it with the oil.  Let it sit for a little while until it gets good and hot.  Add your chicken broth and salsa.  Stir to combine.  Bring to a boil.  When it's boiling stir it once and reduce your heat.  Cover and let it simmer 20 minutes.  Don't remove the lid at all during this cooking time.  It will result in some sticky rice.  When it's done fluff it with a fork and serve.  YUM!

Hoping we can start blogging a bit more!  Welcome to all the new followers!

Have a great weekend! 

Love, Erica*

Wednesday, August 8, 2012

Digi Day

It's been a long time. I know. Forgive me. Posting will be sparse for a few more weeks. I wanted to get up some digi pages though. Somehow I've been able to keep up with my scrapbooking in all the chaos that has been my life. It's a good life though, I won't complain. I do miss this though, this blog, the readers. Can't wait to get back to a routine but glad for a Summer of business. Being busy means we are building memories. Can't complain there.

Okay, here goes...

 Love these cute kiddos. Can't believe Back to School is right around the corner. Kit by Fancy Pants Designs. Full Credits Here.

 I love how this turned out. Can you believe how big this girl is? This is a template from the Photoshop Friday Series. I've told you about them. Good deal. Seriously. Full Credits Here.

 We vacationed this year in Heber. It was such a fun trip. Photos by Aunt Carla. Full Credits Here.

 I love this layout. This is our final photo from our home in Missouri. This was such an emotional day. This kit is by Echo Park. It's a cute one. Full Credits Here.

 Cute girl. Cute photos! Full Credits Here.

 I LOVE this layout. I'm still just digging on Grey. Love it. The girl makes it of course. ;) Is my one year old stinkin' adorable or what?! I love these misting masks by Splendid Fiin too. Take any plain paper and make it awesome. Full Credits Here.

 This is another Photoshop Friday template. I love this one so much I've used it twice! Full Credits Here.

Somehow my shadows changed in my resizing. I need to fix this before printing. Full Credits Here.

Alrighty, now that I've bombarded you with my pages. I guess if you're still reading you need an award!
Or a big hug and thanks.
:)

We'll be back soon with some regular posting. Hoping your Summer has been as wonderful as mine!

Love, Monica


Related Posts Plugin for WordPress, Blogger...