Friday, July 30, 2010

Chicken Fettucini Alfredo

Being pregnant has it's perks, but it's not so great when what you are craving is out of town.  I live in a small town and that night I was craving Olive Garden's Seafood Fettucini.  I was craving it so bad I was almost in tears.  Am I the only one that has ever felt this way?  It was weird.  I was driving my husband crazy!  He offered to drive me out of town, but I felt guilty to just go for THAT!  So I said no, and searched the web for Olive Garden's Alfredo sauce recipe.  And HEAVENS TO BETSY, I FOUND IT!  :o)  Now, they say it's not the exact because what they get at the restaurant is in a vacuum sealed bag, but I think it tasted pretty darn close and Jason really liked it.  It was pretty easy too. 

 I'm really sorry about the picture.  I'm not that great of a photographer yet.  
It really was delicious...and yes...that is one helping...MY HELPING!  ;o)

Ingredients:

1 pint heavy cream
1 stick butter
2 tablespoons cream cheese
1/2 cup grated Parmesan cheese - (to 3/4)
1 teaspoon garlic powder
(I never said this dish was healthy!)

Cooking Directions:
In a saucepan combine butter, heavy cream, and cream cheese. Simmer this until all is melted, and mixed well. Add the Parmesan cheese and Garlic powder. Simmer this for 15 to 20 minutes on low, stirring frequently.  You may wish to season with a little salt and pepper.

I used 3 chicken breasts cubed them up and put them in a pan with some butter and seasoned with some garlic salt with parsley, and pepper.

I cooked up a whole 16 oz. package of fettucini, which I thought was too much so you can eyeball it.  I had enough left over to make me and the kids some fried noodles for lunch the next day.  YUM!

When the sauce was done I threw in the cooked chicken and stirred it in good.  Put my noodles on a plate and topped it with the sauce.  Serve with some garlic bread and some fresh steamed asparagus.

It was an awesome meal and I am so happy to have fixed my craving for awhile.

Thursday, July 29, 2010

Weekly Layouts

For those of you who are bored with the scrapbooking. I apologize. For those that are interested, I hope you enjoy. Digital Scrapbooking is all the fun without the mess. Really! All you need is a computer and a editing program like Photo Shop or Illustrator, some digi products and whala! When I am done scrapping, I close my laptop and my mess is cleaned up. Once a week, I will be posting a few of my layouts and giving you info. on certain products or sales or techniques. This whole digital thing can be used for more than scrapbooking. You can make baby announcements, party invitations, cards for friends, and many more. It is a good skill to learn and really saves money.

First things first. Digi scrapping is definitely a skill that needs to be learned. Don't let me scare you away though. With good instruction it's easy to learn and stinkin' fun. When I decided to learn the whole digi scrapping deal, I googled it. I will save you the time and effort of finding one for yourself and point the way. The best place to learn how to digi scrap and use photoshop is JessicaSprague.com. I'm honestly not just saying that because I'm on her Creative Team. I love her classes and I love the products on the website.

The first class is called Up and Running and has just barely been updated. You will enjoy it I promise. It is well worth the money. That is how I started out and I recommend it fully.

Here are my layouts for the week. The first one features my sweet little girl. Lately she has been a pill to take photos of. I'm sure many of you can relate to the unwilling subject. I ended up with a series of cute shots of her and had to scrap them. You can find the credits for this layout here.


This one is of my brother-in-law and his new wife. I captured this shot of them coming out of the temple after being married. Cute, cute. Credits can be found here.


If you have any questions at all about digi scrapping, please email me or leave a comment. I am totally willing to answer any questions you have.  :)

Wednesday, July 28, 2010

Playdough

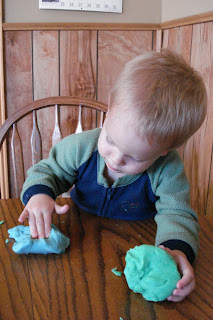
If I knew how easy it was to make Playdough, I would have done it sooner.  There were TONS of recipes online and this one I had everything on hand, and it was fast making it.  My son, Coy, really enjoyed it too. He didn't know what to think of Mom putting two balls of "cake" in front of him.  He took a piece and ate it and changed his mind about it being cake.  :o)  He played with it for awhile not sure what to think of it.  I think it was fun for him to pound it down and squish it in between his fingers.

Here's the recipe-

1 c. water
2 Tbsp. oil
1/2 tsp. salt
1 c. flour
2 tsp. cream of tarter

Combine all ingredients in a medium sauce pan.  Heat on medium heat stirring til it forms into a ball.  Take off heat and add food coloring.  I seperated mine in two and made a green and blue one.  Store in ziploc or airtight container. 

I thought it was some what therapeutic kneading the color into the hot dough.  :o) 

Something about the smell of it takes me back to childhood...YUMMY!

Tuesday, July 27, 2010

Chocolate Sheet Cake

I know there are a lot of Chocolate Sheet Cake recipes. This one has to be my favorite. I've heard others claim to have the best but after trying others I have found no other cake compares. This one is moist, delightful to the palate, and will make any bad day a whole lot better. There is not a fantastic story to this recipe. I got it from my mother-in-law and she can't remember where she got it from. It's just one of "those". You know, one of those recipes that gets passed along from one person to another and maybe given a hundred names like Granny B's Chocolate Sheet Cake, or Auntie Sue's Chocolate Dream Cake. No one knows where it originated from or how many times it's been changed. All we know is it is perfect now just the way it is and we call it plain 'ole Chocolate Sheet Cake.

Enjoy!


Chocolate Sheet Cake
2 cups flour
2 cups sugar
1/2 teas. salt
2 cubes butter
1 cup water
3 Tbls. Cocoa powder
2 eggs
1 teas. baking soda
1/2 cup buttermilk
1 teas. vanilla
1 teas. cinnamon

Melt butter, water, and cocoa in a saucepan. Bring to a boil and pour over flour, sugar, and salt. Mix slightly then add remaining ingredients. Mix approximately 2 minutes on medium speed. Bake in a large greased and floured sheet pan at 350 for 20-30 minutes. Mine took 20 and was perfect.

Frosting
1 cube butter
3 Tablespoons Cocoa Powder
5 Tablespoons Milk

1 lb. powdered sugar
1 teas. vanilla

Melt butter, milk, and cocoa in a saucepan. Bring to a boil then add powdered sugar and vanilla. I didn't sift my PS and my frosting had some lumps. I put it through a small mesh strainer and it came out smooth. Frost the cake while still warm.

Please feel free to ask questions and let us know if you try it!

Monday, July 26, 2010

Snickerdoodle Blondies by Erica

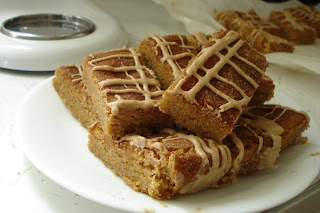
Hi!  Erica here.  :o)  Today I wanted to make something different than the usual cookie, so I thought I'd try out these snickerdoodle blondies i've been eyeballing for a few months now on THIS website. Can I just say WOW!  They are yummy.  My kids loved them, and I can't wait for the hubs to come home and try them.  They were pretty simple to put together and I had all the ingredients on hand.  Which is always AWESOME.  If you try them, let us know what you thought of them.  Who doesn't love snickerdoodles?

Cookies:
2 2/3 cups all-purpose flour
2 tsp. baking powder
1 tsp. ground cinnamon
¼ tsp. ground nutmeg
½ tsp. cream of tartar
1 tsp. salt
2 cups brown sugar, packed
1 cup butter, at room temperature
2 large eggs, at room temperature
1 Tbsp. vanilla extract
1 cup cinnamon chips, optional

Topping:
2 Tbsp. granulated sugar
1 tsp. ground cinnamon
pinch of nutmeg

Glaze (optional):
1 cup powdered sugar, sifted
1 tsp. ground cinnamon
¼ cup heavy whipping cream
1 tsp. vanilla extract

1. Preheat oven to 350 degrees F. Spray 9×13-inch pan with nonstick spray. Line pan with parchment and let it hang over the sides. Spray parchment with nonstick spray too.

2. In a medium bowl, whisk together flour, baking powder, cinnamon, nutmeg, cream of tartar and salt; set aside.

3. In a large bowl, cream together butter and brown sugar with an electric mixer (3 to 5 minutes). Mix in eggs, one at a time, then vanilla. Keep beating until mixture is smooth.

4. Stir in flour mixture until well blended. If using cinnamon chips, stir them in now. The batter will be thick. Spread it evenly into the prepared pan. Spray your hands with cooking spray and use them to pat the mixture down evenly.

5. Combine the topping ingredients in a small bowl; sprinkle evenly on top of batter.

6. Bake 25 to 30 minutes or until surface springs back when gently pressed. Let pan cool completely.

7. When ready to cut, use ends of parchment paper to lift out baked bars. Place on a cutting board. If you’re adding the glaze, whisk the glaze ingredients in a medium bowl and drizzle onto the bars in decorative fashion. Let glaze set (this will work more quickly in the refrigerator) then use a large, sharp knife to cut into bars.

Makes 20 to 24 bars

I'm so excited to start this fun blog with my sis and show you the fun projects we are doing around here. Plus it's a way for me to see what my amazing sister is up to in Missouri. And maybe you'll get to see me do a couple crafts and it will most likely make you laugh because I am THAT uncoordinated.  :o) Until next time...
Erica*

Well, well, well...

As you see I have changed the title of this blog...same address, different title.  Life evolves and I wanted a place I could post all of my crafty/cooking/baking adventures. As luck would have it, I have a really awesome sister who can cook some pretty tasty dishes. We wanted to do a blog together so alas here we are!

The idea for the title of the blog came from Erica. I told her to start thinking of a title and she gave me a hard time as usual giving me all the excuses in the book of why and how she wasn't creative. All the while she was straightening up her living room and stepped over a coloring book titled "The Giant Book of Coloring and Other Activities". She mentioned the above title and we loved it, so there you go.

Here you will find many of the things we enjoy doing on a daily basis plus some ideas or links to other blogs we find amazing. Erica will cook, bake, and post the occasional craft (hopefully more). She enjoys decorating her home and loving her little farm family in Idaho. You will see me doing baking, crafts, and a weekly post on my digital scrapbooking.

We are excited to introduce to you....

The GIANT blog of cooking, crafting, and other fun activities!

Enjoy!


This layout has a cute story. Recently, I made a wedding cake for my brother in law and his new wife. My little sissy sue was enjoying a spoonful of frosting and made this comment. I had to laugh, because I totally agree. She is my girl! You can find product credits here!
Related Posts Plugin for WordPress, Blogger...